The Rename Patches Valeton GP100 is a versatile and powerful multi-effects processor designed to give guitarists a wide range of tonal possibilities. One of the essential features of this device is its ability to store and customize patches for various sounds and performances. But what if you want to rename those patches to make them more personalized and easier to navigate? In this guide, we’ll walk you through the process of renaming patches on the Valeton GP100, providing you with all the information you need to organize your patches effectively.
Table of Contents
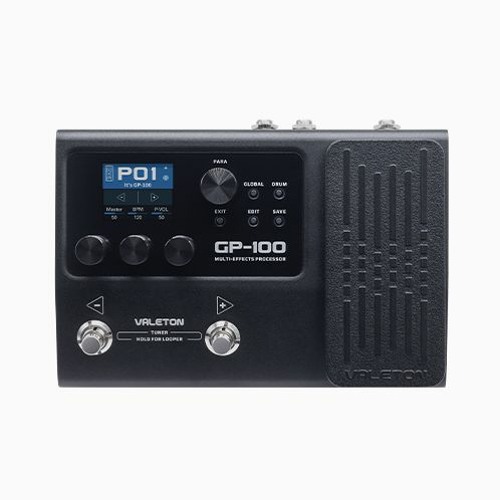
What is the Valeton GP100?
Before diving into the details of renaming patches, it’s essential to understand what the Valeton GP100 is and how it works. This unit is a multi-effects processor that combines high-quality amp simulations, effects, and a user-friendly interface. It features a broad range of presets that can be adjusted and modified to suit your needs. The ability to rename patches Valeton GP100 is one of the most valuable functions of this device, allowing you to keep your sound library organized and easily accessible.
Why Rename Patches on the Valeton GP100?
Renaming patches on the Valeton GP100 provides several key advantages:
- Better Organization: Custom patch names make it easier to navigate through your sound library, especially when you have a large number of presets.
- Performance Efficiency: When performing live, being able to quickly identify a specific patch by name can save you precious time and reduce confusion.
- Personalization: Renaming patches allows you to assign meaningful names to sounds that reflect their intended use, such as “Clean Rhythm,” “Heavy Solo,” or “Ambient Delay.”
- Ease of Recall: Instead of scrolling through a long list of generic names, you can instantly access patches with names that are easy to remember.
Steps to Rename Patches on the Valeton GP100
Renaming patches on the Valeton GP100 is a simple process, but it requires attention to detail. Here’s a step-by-step guide on how to rename your patches.
1. Power On Your Valeton GP100
To begin the process, ensure that your Valeton GP100 is powered on and functioning properly. Press the power button and wait for the unit to load its default settings.
2. Select the Patch You Want to Rename
Once the device is powered on, use the “Patch” knob or buttons to navigate through the available patches. Select the patch you want to rename by pressing the corresponding button or turning the knob until the desired patch is displayed.
3. Enter the Edit Mode
After selecting the patch, enter the edit mode. You can usually do this by pressing the “Edit” or “Settings” button, depending on your specific model. This will give you access to various parameters that can be adjusted, including the patch name.
4. Access the Patch Name Field
In edit mode, navigate to the patch name field. This is where you will be able to input the new name for your patch. The Valeton GP100 typically allows you to edit the name using a combination of buttons or a rotary encoder, depending on the model.
5. Rename the Patch
Once you’re in the patch name field, use the interface to type in the new name. You may be able to cycle through letters, numbers, and symbols using the rotary knob or arrow buttons. Take your time to create a name that is meaningful and easy to remember. Avoid using overly complex names, as this can make it harder to identify your patches quickly during a performance.
6. Save the Changes
After you’ve typed in the new name, make sure to save the changes. There should be a “Save” or “OK” button on the screen to confirm your changes. Press this button, and the patch will be renamed and saved to the system.
7. Exit the Edit Mode
Finally, exit the edit mode by pressing the “Exit” or “Home” button, depending on your preferences. This will bring you back to the main screen, and your renamed patch will now be available for immediate use.
Tips for Renaming Patches on the Valeton GP100
- Use Short and Descriptive Names: While it’s tempting to use long or complicated names, keep in mind that short and descriptive names will be much easier to navigate. Think about the specific tone or effect the patch provides and name it accordingly.
- Stay Consistent: If you are renaming multiple patches, try to maintain a consistent naming convention. For example, you could use a pattern like “Lead [Effect Type]” or “Rhythm [Amp Model].” This will help you quickly find the right sound when performing.
- Avoid Overwriting Default Patches: Some of the default patches on the GP100 may be useful for specific genres or effects. It might be a good idea to rename a patch without overwriting the default, just in case you want to use it again in the future.
- Back Up Your Settings: If you have customized patches, consider backing up your settings to avoid losing them. The Valeton GP100 may allow you to transfer your patches to a computer or an external device, ensuring that all your hard work is preserved.
Common Issues When Renaming Patches on the Valeton GP100
While the process of renaming patches on the Valeton GP100 is straightforward, there are a few common issues users might face:
1. Incorrect Patch Names Displaying
If you find that your patch name isn’t showing correctly, it may be due to a glitch or incorrect input. Try re-entering the name and saving it again. If the problem persists, consult the user manual or reset the device to its factory settings and start over.
2. Unable to Save Changes
If the Valeton GP100 isn’t saving your changes, ensure that you are pressing the correct “Save” button and that the patch is not locked. Sometimes, certain patches may be protected from editing, so make sure the patch is editable before renaming it.
3. Lack of Space for Long Names
Some users may encounter issues when trying to input longer names. The device may have a character limit for patch names, so make sure your name is within the allowed character limit. If necessary, shorten the name to fit within the available space.
Also read: Steven Maranga Nyambega: A Visionary Leader and Transformational Humanitarian
Conclusion: Renaming Patches on the Valeton GP100 is Easy!
In conclusion, renaming patches on the Valeton GP100 is an essential feature that can help you organize and personalize your sound library. By following the steps outlined above, you can easily rename your patches to suit your style and performance needs. Whether you’re playing live or recording in the studio, having clear, descriptive patch names will make your experience with the GP100 much more efficient and enjoyable.
Remember to keep your patch names short, descriptive, and consistent to maximize your workflow. With these tips and the knowledge of how to rename patches, you’ll have complete control over your Valeton GP100’s sound library, ensuring that every performance is tailored to your needs.